- ReactJS 菜鸟教程
- ReactJS 教程
- ReactJS - 简介
- ReactJS - 安装
- ReactJS - 特性
- ReactJS - 优点和缺点
- ReactJS - 架构
- ReactJS - 创建 React 应用程序
- ReactJS - JSX
- ReactJS - 组件
- ReactJS - 嵌套组件
- ReactJS - 使用组件
- ReactJS - 组件集合
- ReactJS - 样式
- ReactJS - 属性(props)
- ReactJS - 使用属性创建组件
- ReactJS - props 验证
- ReactJS - 构造函数
- ReactJS - 组件生命周期
- ReactJS - 事件管理
- ReactJS - 创建事件感知组件
- ReactJS - 在Expense Manager APP中引入事件
- ReactJS - 状态管理
- ReactJS - 状态管理 API
- ReactJS - 无状态组件
- ReactJS - 使用 React Hooks 进行状态管理
- ReactJS - 使用 React 钩子的组件生命周期
- ReactJS - 组件的布局
- ReactJS - 分页
- ReactJS - Material 用户界面
- ReactJS - Http 客户端编程
- ReactJS - 表单编程
- ReactJS - 受控组件
- ReactJS - 不受控制的组件
- ReactJS - Formik
- ReactJS - 条件渲染
- ReactJS - 列表
- ReactJS - 键
- ReactJS - 路由
- ReactJS - 冗余
- ReactJS - 动画
- ReactJS - 引导程序
- ReactJS - 地图
- ReactJS - 表格
- ReactJS - 使用 Flux 管理状态
- ReactJS - 测试
- ReactJS - CLI 命令
- ReactJS - 构建和部署
- ReactJS - 示例
- ReactJS - 钩子简介
- ReactJS - 使用 useState
- ReactJS - 使用 useEffect
- ReactJS - 使用 useContext
- ReactJS - 使用 useRef
- ReactJS - 使用 useReducer
- ReactJS - 使用 useCallback
- ReactJS - 使用 useMemo
- ReactJS - 自定义钩子
- ReactJS - 可访问性
- ReactJS - 代码拆分
- ReactJS - 上下文
- ReactJS - 错误边界
- ReactJS - 转发引用
- ReactJS - 片段
- ReactJS - 高阶组件
- ReactJS - 与其他库集成
- ReactJS - 优化性能
- ReactJS - 分析器 API
- ReactJS - 门户
- ReactJS - 没有 ES6 ECMAScript 的 React
- ReactJS - 没有 JSX 的 React
- ReactJS - 协调
- ReactJS - 引用和 DOM
- ReactJS - 渲染属性
- ReactJS - 静态类型检查
- ReactJS - 严格模式
- ReactJS - Web 组件
- ReactJS - 日期选择器
- ReactJS - Helmet
- ReactJS - 内联样式
- ReactJS - 属性类型
- ReactJS - 浏览器路由器
- ReactJS - DOM
- ReactJS - 旋转木马
- ReactJS - 图标
- ReactJS - 表单组件
- ReactJS - 参考 API
ReactJS - TestRenderer.act() 方法
React 测试对于确保我们的组件按预期运行非常重要。因此,我们将查看 TestRenderer.act() 函数,这是一个使测试更容易的有用工具。
TestRenderer.act() 是“react-test-renderer”库中可用的函数。这种方法允许我们为断言准备一个 React 组件。它类似于 'react-dom/test-utils' 中的 act() 助手,它使测试 TestRenderer 组件变得容易。
语法
TestRenderer.act(callback);
首先,我们必须导入必要的函数 -
import { create, act } from 'react-test-renderer';
让我们考虑一个例子,其中我们有一个名为 App 的组件,它获取一个名为 value 的属性 -
import App from './app.js';
// render the component
let root;
act(() => {
root = create(<App value={1} />);
});
// make assertions on root
expect(root.toJSON()).toMatchSnapshot();
在此代码中,我们创建一个 App 组件的实例,其 prop 的值等于 1。act() 方法包装了此创建过程,以确保组件已准备好进行测试。
现在,我们将使用不同的属性更新组件 -
// update with some different props
act(() => {
root.update(<App value={2} />);
});
// make assertions on root
expect(root.toJSON()).toMatchSnapshot();
再次使用 act() 时,我们可以使用新的 props 安全地更新组件,并在更新的组件上做出断言。
例子
让我们通过使用 TestRenderer.act(callback) 函数创建小型 React 应用程序来使用这些信息。我们将展示此功能如何在许多测试场景中发挥作用。
示例 - 基本组件
在第一个应用程序中,我们将检查一件简单的事情 - 我们称为“BasicComponent”的 React 程序的基本部分。这就像我们项目的一小块。这部分不需要任何额外的信息。我们想看看当我们在屏幕上显示它时它是否看起来正确。我们检查的方法是创建它并确保它看起来就像我们预期的那样。
BasicComponent.js
import React from 'react';
const BasicComponent = () => {
return (
<div>
<h1>Hello, I'm a Basic Component!</h1>
<p>This is a simple React component for testing.</p>
</div>
);
};
export default BasicComponent;
App.js
import { create, act } from 'react-test-renderer';
// Import the component
import BasicComponent from './BasicComponent.js';
let root;
act(() => {
root = create(<BasicComponent />);
});
expect(root.toJSON()).toMatchSnapshot();
输出
在此示例中,BasicComponent 是一个基本的 React 功能组件,它创建一个带有 h1 标题和 p 段落的 div。此组件用于测试,其输出将与测试代码中的快照进行比较。
示例 - 带有 Props 的组件
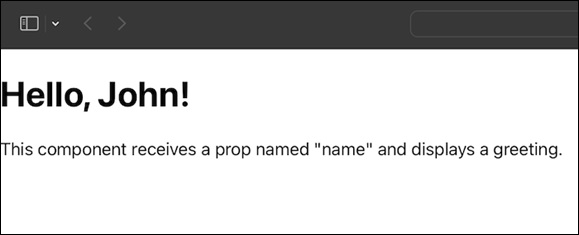
第二个应用用于测试一个名为 ComponentWithProps 的 React 组件,该组件获取一个值为“John”的名称属性。此示例演示如何使用 TestRenderer.act() 创建具有特定功能的组件实例,并确认渲染结果与所需的快照匹配。
ComponentWithProps.js
import React from 'react';
const ComponentWithProps = (props) => {
return (
<div>
<h1>Hello, {props.name}!</h1>
<p>This component receives a prop named "name" and displays a greeting.</p>
</div>
);
};
export default ComponentWithProps;
App.js
import { create, act } from 'react-test-renderer';
// Import the component
import ComponentWithProps from './ComponentWithProps.js';
let root;
act(() => {
root = create(<ComponentWithProps name="John" />);
});
expect(root.toJSON()).toMatchSnapshot();
输出
在上面的代码中,ComponentWithProps 是另一个简单的功能组件,它接收一个名为 name 的道具。此属性用于创建显示在 h1 标题中的问候语。该段落还对这一组成部分作了简要说明。
示例 - 动态组件
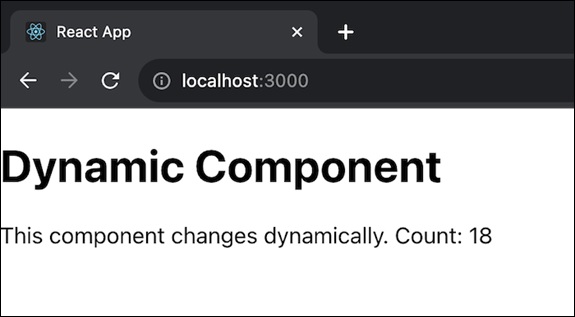
在这个程序中,我们将展示如何测试一个名为 DynamicComponent 的动态 React 组件。此组件的生命周期将包括状态更新或属性更改等更改。该测试使用设置组件并通过更新组件来重新创建动态更改。这显示了 TestRenderer.act() 如何处理动态组件行为。
DynamicComponent.js
import React, { useState, useEffect } from 'react';
const DynamicComponent = () => {
const [count, setCount] = useState(0);
useEffect(() => {
// Dynamic changes after component mount
const interval = setInterval(() => {
setCount((prevCount) => prevCount + 1);
}, 1000);
// Clean up interval on component unmount
return () => clearInterval(interval);
}, []);
return (
<div>
<h1>Dynamic Component</h1>
<p>This component changes dynamically. Count: {count}</p>
</div>
);
};
export default DynamicComponent;
App.js
import { create, act } from 'react-test-renderer';
// Import the component
import DynamicComponent from './DynamicComponent.js';
let root;
act(() => {
root = create(<DynamicComponent />);
});
// dynamic changes
act(() => {
root.update(<DynamicComponent />);
});
expect(root.toJSON()).toMatchSnapshot();
输出
在此示例中,DynamicComponent 是一个使用 useState 和 useEffect 钩子的功能组件。它使用 setInterval 启动计时器,在初始化计数状态后每秒增加计数。这表示组件随时间推移的动态变化。
此外,上面的示例展示了如何使用 TestRenderer.act() 来测试各种类型的 React 组件。通过遵循这些模式,我们可以简化我们的测试过程,并确保我们的 React 应用程序的可靠性。
注意
在使用 react-test-renderer 时,使用 TestRenderer.act() 非常重要,以确保与 React 的内部行为兼容,并纠正和可靠的测试结果。
总结
TestRenderer.act() 是 react-test-renderer 库中可用的一个函数。它的主要目的是帮助测试 React 组件。它确保我们的测试以与 React 更新用户界面的方式非常相似的方式执行。因此,我们已经了解了它是如何工作的,以及如何在不同场景中使用此功能。