ReactJS - 高阶组件


由于 react 组件是通过组合(将一个组件置于另一个组件中)而不是通过继承来互连的,因此 react 组件中使用的逻辑不会直接共享给另一个组件。React 社区提供了多种选项来在组件之间共享逻辑,其中一个选项是高阶组件。HOC 本身不是 React API,而是一种没有副作用的设计模式。

在本章中,让我们学习如何使用高阶组件。

如何使用高阶组件

基本上,HOC 是一个函数,它将 react 组件作为输入,然后根据输入组件创建新的 react 组件并返回新创建(包装)的组件。例如,HOC函数可能会接收一个纯数据渲染组件作为输入,然后返回一个新的组件,该组件将具有使用输入组件的数据获取能力和数据渲染能力。

让我们看看如何使用 HOC 并以逐步的方式在两个组件之间共享逻辑。让我们考虑一下从外部 URL 获取和呈现数据的场景。

  • 根据功能,使用一个或多个输入参数创建 HOC 函数。
  • HOC 函数的第一个参数应该是具有辅助逻辑(例如,数据渲染逻辑)的 react 组件。
  • HOC 函数的第二个参数应根据我们的要求进行定义。对于我们的数据获取方案,数据 url 是获取数据的必要信息。因此,我们应该将其作为 HOC 函数的第二个参数包含在内。

function createHOC(WrappedComponent, url) {
	 	// create new component using WrappedComponent
}
  • 如果确实有必要,任何数量的参数对于 HOC 函数都可以。
  • 在其 componentDidMount 事件中,在 HOC 函数内创建一个新组件,以支持主要逻辑(例如,使用第二个 url 参数的数据获取逻辑)。

function createFetchHOC(WrappedComponent, url) {
	 	class DataFetcher extends React.Component {
	 	 	 componentDidMount() {
	 	 	 	 	fetch(url)
	 	 	 	 	 	 .then((response) => response.json())
	 	 	 	 	 	 .then((data) => {
	 	 	 	 	 	 	 	this.setState({
	 	 	 	 	 	 	 	 	 data: data
	 	 	 	 	 	 	 	});
	 	 	 	 	});
	 	 	 }
	 	}
}
  • 通过传递从 componentDidMount 事件获取的数据来呈现输入组件。

function createFetchHOC(WrappedComponent, url) {
	 	class DataFetcher extends React.Component {
	 	 	 render() {
	 	 	 	 	return (
	 	 	 	 	 	 <WrappedComponent data={this.state.data} {...this.props} />
	 	 	 	 	)
	 	 	 }
	 	}
}
  • 返回新创建的组件。

function createFetchHOC(WrappedComponent, url) {
	 	class DataFetcher extends React.Component {
	 	}
	 	return DataFetcher;
}
  • 通过组合 DataFetcher (createFetchHOC) 和 Wrapped 组件来创建一个新组件。

const UserListWithFetch = createFetchHOC(
	 	UserList,
	 	"users.json"
);
  • 最后,根据需要在任何地方使用新组件

 <UserListWithFetch />

应用 HOC 组件

让我们通过应用 HOC 组件来创建一个新应用程序。

首先,创建一个新的 react 应用程序并使用以下命令启动它。

create-react-app myapp
cd myapp
npm start

接下来,打开 App.css (src/App.css) 并删除所有 CSS 类。


 // remove all css classes

接下来,创建一个新的 HOC 函数,如下所示 -


import React from 'react';
function createFetchHOC(WrappedComponent, url) {
	 	class DataFetcher extends React.Component {
	 	 	 constructor(props) {
	 	 	 	 	super(props);
	 	 	 	 	this.state = {
	 	 	 	 	 	 data: []
	 	 	 	 	};
	 	 	 }
	 	 		
	 	 	 componentDidMount() {
	 	 	 	 	fetch(url)
	 	 	 	 	.then((response) => response.json())
	 	 	 	 	.then((data) => {
	 	 	 	 	 	 this.setState({
	 	 	 	 	 	 	 	data: data
	 	 	 	 	 	 });
	 	 	 	 	});
	 	 	 }
	 	 	 render() {
	 	 	 	 	return (
	 	 	 	 	 	 <WrappedComponent data={this.state.data} {...this.props} />
	 	 	 	 	)
	 	 	 }
	 	}
	 	return DataFetcher;
}
export default createFetchHOC;

接下来,创建一个文件,users.json (public/users.json) 在 public 文件夹中存储用户信息。我们将尝试使用 FetchRenderProps 组件获取它,并在我们的应用程序中显示它。


[{"id":1,"name":"Fowler","age":18},
{"id":2,"name":"Donnell","age":24},
{"id":3,"name":"Pall","age":26}]

接下来,创建一个文件,todo_list.json (public/todo_list.json) 在 public 文件夹中存储待办事项列表信息。我们将尝试使用 FetchRenderProps 组件获取它,并在我们的应用程序中显示它。


[{"id":1,"title":"Learn JavaScript","is_done":true},
{"id":2,"title":"Learn React","is_done":true},
{"id":3,"title":"Learn Typescript","is_done":false}]

接下来,创建一个新组件 UserList (src/Components/UserList.js) 来渲染用户,如下所示 -


import React from "react";
class UserList extends React.Component {
	 	constructor(props) {
	 	 	 super(props);
	 	}
	 	render() {
	 	 	 return (
	 	 	 	 	<>
	 	 	 	 	 	 <ul>
	 	 	 	 	 	 	 	{this.props.data && this.props.data.length && this.props.data.map((item) =>
	 	 	 	 	 	 	 	 	 <li key={item.id}>{item.name}</li>
	 	 	 	 	 	 	 	)}
	 	 	 	 	 	 </ul>
	 	 	 	 	</>
	 	 	 )
	 	}
}
export default UserList;

在这里,我们使用了 data 属性来渲染用户列表

接下来,创建一个新组件 TodoList (src/Components/TodoList.js) 来渲染待办事项,如下所示 -


import React from "react";
class TodoList extends React.Component {
	 	constructor(props) {
	 	 	 super(props);
	 	 	 this.todos = this.props.data
	 	}
	 	render() {
	 	 	 return (
	 	 	 	 	<>
	 	 	 	 	 	 <ul>
	 	 	 	 	 	 	 	{this.props.data && this.props.data.length && this.props.data.map(
	 	 	 	 	 	 	 	 	 (item) =>
	 	 	 	 	 	 	 	 	 <li key={item.id}>{item.title} {item.is_done && <strong>Done</strong>}</li>
	 	 	 	 	 	 	 	)}
	 	 	 	 	 	 </ul>
	 	 	 	 	</>
	 	 	 )
	 	}
}
export default TodoList;

在这里,我们使用了 data 属性来渲染待办事项列表。

接下来,创建一个新组件 SimpleHOC,通过单个 HOC 组件呈现用户列表和待办事项列表。


import React from "react";
import UserList from "./UserList";
import TodoList from "./TodoList";
import createFetchHOC from "./createFetchHOC";
const UserListWithFetch = createFetchHOC(
	 	UserList,
	 	"users.json"
);

const TodoListWithFetch = createFetchHOC(
	 	TodoList,
	 	"todo_list.json"
);

class SimpleHOC extends React.Component {
	 	constructor(props) {
	 	 	 super(props);
	 	}
	 	render() {
	 	 	 return (
	 	 	 <>
	 	 	 	 	<UserListWithFetch />
	 	 	 	 	<TodoListWithFetch />
	 	 	 </>
	 	 	 )
	 	}
}
export default SimpleHOC;

在这里,我们有,

  • 通过组合 TodoList 和 DataFetcher 组件创建了 UserListWithFetch 组件。
  • 通过结合 Users 和 DataFetcher 组件创建了 TodoListWithFetch 组件。

接下来,打开 App.js 并使用 SimpleHOC 组件更新它。


import './App.css'
import React from 'react';
import SimpleHOC from './Components/SimpleHOC'

function App() {
	 	return (
	 	 	 <div className="container">
	 	 	 	 	<div style={{ padding: "10px" }}>
	 	 	 	 	 	 <div>
	 	 	 	 	 	 	 	<SimpleHOC />
	 	 	 	 	 	 </div>
	 	 	 	 	</div>
	 	 	 </div>
	 	);
}
export default App;

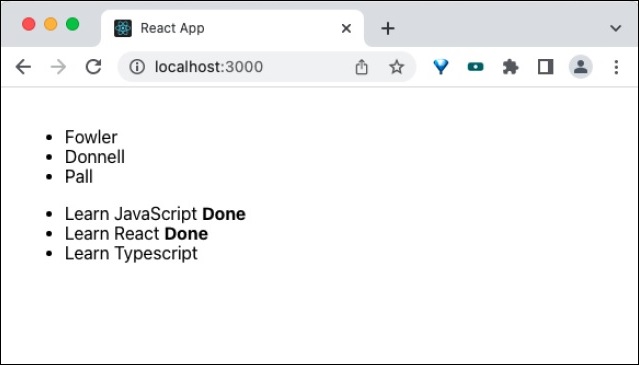
最后,在浏览器中打开应用程序并检查最终结果。应用程序将如下所示 -

应用 HOC 组件

总结

高阶组件是在组件之间共享逻辑的有效方法。它被广泛用于许多第三方组件中,具有良好的成功率,并且在反应域中共享逻辑是经过时间考验的方法。