ReactJS - Helmet


网络文档的元信息对于SEO目的非常重要。文档的元信息通常使用 meta 标签在头部内部指定。标题标签在提供有关文档的元信息方面也起着重要作用。头部部分也将有脚本和样式标签。Helmet 组件通过提供所有有效的头部标签,提供了一种管理文档头部部分的简单方法。Helmet 将收集其中指定的所有信息,并更新文档的头部部分。

在本章中,让我们学习如何使用 Helmet 组件。

安装 Helmet

在了解 helmet 的概念和用法之前,让我们学习如何使用 npm 命令安装 helmet 组件。

npm install --save react-helmet

上述命令将安装 Helmet 组件,并准备在我们的应用程序中使用。

Helmet 的概念和用法

Helmet 接受所有有效的头部标签。它接受纯HTML标签,并在文档的头部部分输出标签,如下所示 -


import React from "react";
import {Helmet} from "react-helmet";
class Application extends React.Component {
	 	render () {
	 	 	 return (
	 	 	 	 	<div className="application">
	 	 	 	 	 	 <Helmet>
	 	 	 	 	 	 	 	<title>Helmet sample application</title>
	 	 	 	 	 	 	 	<meta charSet="utf-8" />
	 	 	 	 	 	 	 	<meta name="description" content="Helmet sample program to understand the working of the helmet component" />
	 	 	 	 	 	 	 	<meta name="keywords" content="React, Helmet, HTML, CSS, Javascript" />
	 	 	 	 	 	 	 	<meta name="author" content="Peter" />
	 	 	 	 	 	 	 	<meta name="viewport" content="width=device-width, initial-scale=1.0" />
	 	 	 	 	 	 </Helmet>
	 	 	 	 	 	 // ...
	 	 	 	 	</div>
	 	 	 );
	 	}
};

这里

  • title 用于指定文档的标题
  • description meta 标签用于指定文档的详细信息
  • keywords 用于指定文档的主要关键字。它将被搜索引擎使用。
  • author 用于指定文档的作者
  • viewport 用于指定文档的默认视图端口
  • charSet 用于指定文档中使用的字符集。

头部部分的输出如下 -


<head>
	 	<title>Helmet sample application</title>
	 	<meta charSet="utf-8" />
	 	<meta name="description" content="Helmet sample program to understand the working of the helmet component" />
	 	<meta name="keywords" content="React, Helmet, HTML, CSS, Javascript" />
	 	<meta name="author" content="Peter" />
	 	<meta name="viewport" content="width=device-width, initial-scale=1.0" />
</head>

Helmet 组件可以在任何其他 react 组件内部使用,以更改标头部分。它也可以嵌套,以便在呈现子组件时标题部分会发生变化。


<Parent>
	 	<Helmet>
	 	 	 <title>Helmet sample application</title>
	 	 	 <meta charSet="utf-8" />
	 	 	 <meta name="description" content="Helmet sample program to understand the working of the helmet component" />
	 	 	 <meta name="keywords" content="React, Helmet, HTML, CSS, Javascript" />
	 	 	 <meta name="author" content="Peter" />
	 	 	 <meta name="viewport" content="width=device-width, initial-scale=1.0" />
	 	</Helmet>
	 	<Child>
	 	 	 <Helmet>
	 	 	 	 	<title>Helmet sample application :: rendered by child component</title>
	 	 	 	 	<meta name="description" content="Helmet sample program to explain nested feature of the helmet component" />
	 	 	 </Helmet>
	 	</Child>
</Parent>

这里

  • Helmet 在子组件中将更新头部部分,如下所示,

<head>
	 	<title>Helmet sample application :: rendered by child component</title>
	 	<meta charSet="utf-8" />
	 	<meta name="description" content="Helmet sample program to explain nested feature of the helmet component" />
	 	<meta name="keywords" content="React, Helmet, HTML, CSS, Javascript">
	 	<meta name="author" content="Peter">
	 	<meta name="viewport" content="width=device-width, initial-scale=1.0">
</head>

应用 Helmet

让我们创建一个新的 react 应用程序来学习如何在本节中应用 Helmet 组件。

首先,创建一个新的 react 应用程序并使用以下命令启动它。

create-react-app myapp
cd myapp
npm start

接下来,打开 App.css (src/App.css) 并删除所有 CSS 类。


 // remove all css classes

接下来,创建一个简单的组件 SimpleHelmet (src/Components/SimpleHelmet.js) 并渲染一个 −


import React from "react";
import {Helmet} from "react-helmet";
class SimpleHelmet extends React.Component {
	 	render() {
	 	 	 return (
	 	 	 	 	<div>
	 	 	 	 	 	 <Helmet>
	 	 	 	 	 	 	 	<title>Helmet sample application</title>
	 	 	 	 	 	 	 	<meta charSet="utf-8" />
	 	 	 	 	 	 	 	<meta name="description" content="Helmet sample program to understand the working of the helmet component" />
	 	 	 	 	 	 	 	<meta name="keywords" content="React, Helmet, HTML, CSS, Javascript" />
	 	 	 	 	 	 	 	<meta name="author" content="Peter" />
	 	 	 	 	 	 	 	<meta name="viewport" content="width=device-width, initial-scale=1.0" />
	 	 	 	 	 	 </Helmet>
	 	 	 	 	 	 <p>A sample application to demonstrate helmet component.</p>
	 	 	 	 	</div>
	 	 	 )
	 	}
}
export default SimpleHelmet;

在这里,我们有,

  • 从 react-helmet 包中导入的 Helmet
  • 在组件中使用了 Helmet 来更新头部部分。

接下来,打开 App 组件(src/App.js),并使用 SimpleHelmet 组件,如下图 -


import './App.css'
import React from 'react';
import SimpleHelmet from './Components/SimpleHelmet'

function App() {
	 	return (
	 	 	 <div className="container">
	 	 	 	 	<div style={{ padding: "10px" }}>
	 	 	 	 	 	 <div>
	 	 	 	 	 	 	 	<SimpleHelmet />
	 	 	 	 	 	 </div>
	 	 	 	 	</div>
	 	 	 </div>
	 	);
}
export default App;

在这里,我们有,

  • 从 react 包中导入的 SimpleHelmet 组件
  • 使用过的 SimpleHelmet 组件

接下来,打开 index.html (public/index.html) 文件并删除元标记,如下所示 -


<!DOCTYPE html>
<html lang="en">
<head>
	 	<link rel="icon" href="%PUBLIC_URL%/favicon.ico" />
	 	<link rel="apple-touch-icon" href="%PUBLIC_URL%/logo192.png" />
	 	<link rel="manifest" href="%PUBLIC_URL%/manifest.json" />
</head>
<body>
	 	<noscript>You need to enable JavaScript to run this app.</noscript>
	 	<div style="padding: 10px;">
	 	 	 <div id="root"></div>
	 	</div>
</body>
</html>

这里

  • title 标签已删除
  • 删除了 description、theme-color 和 viewport 的 meta 标记

最后,在浏览器中打开应用程序并检查最终结果。
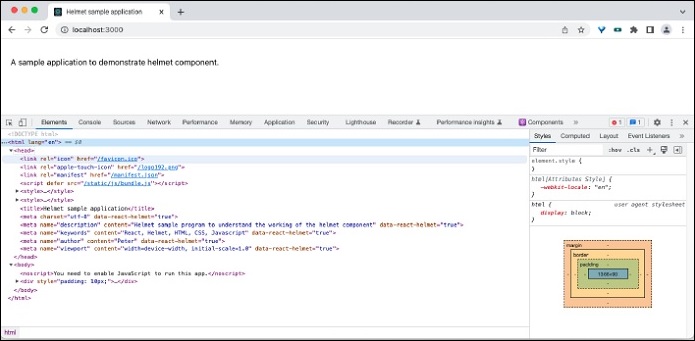
Applying Helmet

在开发工具中打开源码,可以看到如下图所示的html信息:


<title>Helmet sample application</title>
<meta charset="utf-8" data-react-helmet="true">
<meta name="description" content="Helmet sample program to understand the working of the helmet component" data-react-helmet="true">
<meta name="keywords" content="React, Helmet, HTML, CSS, Javascript" data-react-helmet="true">
<meta name="author" content="Peter" data-react-helmet="true">
<meta name="viewport" content="width=device-width, initial-scale=1.0" data-react-helmet="true">

总结

Helmet 组件是一个易于使用的组件,用于管理文档的头部内容,支持服务器端和客户端渲染。