在受控组件中,React 为所有输入元素提供了一个特殊的属性,即值,并控制输入元素。value 属性可用于获取和设置输入元素的值。它必须与组件的状态同步。
换句话说,呈现表单的 React 组件还控制在后续用户输入时该表单中发生的情况。一个输入表单元素,其值被React以这种方式控制,被称为“受控组件”。
受控组件必须遵循特定的过程来进行表单编程。
具有单输入的受控组件
让我们检查一下对于单个输入元素要遵循的分步过程。
第 1 步 - 创建表单元素。
<input type="text" name="username" />第 2 步 - 为输入元素创建状态。
this.state = {
	 	username: ''
}第 3 步 - 添加值属性并从状态分配值。
<input type="text" name="username" value={this.state.username} />第 4 步 - 添加 onChange 属性并分配处理程序方法。
<input type="text" name="username" value={this.state.username} onChange={this.handleUsernameChange} />第 5 步 - 编写处理程序方法,并在触发事件时更新状态。
handleUsernameChange(e) {
	 	this.setState({
	 	 	 username = e.target.value
	 	});
}第 6 步 - 在组件的构造函数中绑定事件处理程序。
this.handleUsernameChange = this.handleUsernameChange.bind(this)最后,在验证和提交过程中,使用 username 从 this.state 获取输入值。
handleSubmit(e) {
	 	e.preventDefault();
	 	alert(this.state.username);
}创建简单表单
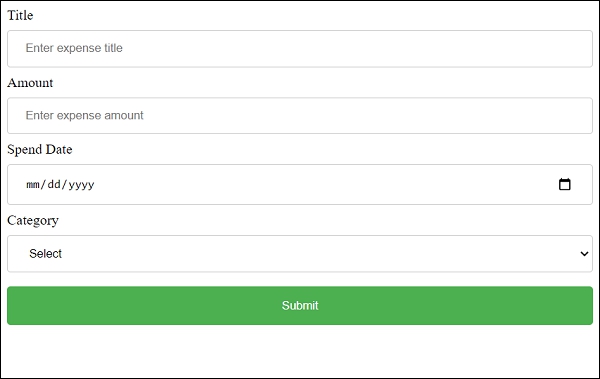
在本章中,让我们创建一个简单的表单来使用控制器组件添加费用分录。
第 1 步 - 首先,按照创建React应用程序一章中的说明,使用Create React App或Rollup打包器创建一个新的react应用程序react-form-app。
第 2 步 - 在您最喜欢的编辑器中打开应用程序。
下一步,在应用程序的根目录下创建 src 文件夹。
按照上述过程,在 src 文件夹下创建组件文件夹。
第 3 步 - 创建一个文件,ExpenseForm.css src文件夹下以设置组件的样式。
input[type=text], input[type=number], input[type=date], select {
	 	width: 100%;
	 	padding: 12px 20px;
	 	margin: 8px 0;
	 	display: inline-block;
	 	border: 1px solid #ccc;
	 	border-radius: 4px;
	 	box-sizing: border-box;
}
input[type=submit] {
	 	width: 100%;
	 	background-color: #4CAF50;
	 	color: white;
	 	padding: 14px 20px;
	 	margin: 8px 0;
	 	border: none;
	 	border-radius: 4px;
	 	cursor: pointer;
}
input[type=submit]:hover {
	 	background-color: #45a049;
}
input:focus {
	 	border: 1px solid #d9d5e0;
}
#expenseForm div {
	 	border-radius: 5px;
	 	background-color: #f2f2f2;
	 	padding: 20px;
}第 4 步- 创建一个文件,ExpenseForm.js src / components文件夹下并开始编辑。
第 5 步 - 导入 React 库。
import React from 'react';导入ExpenseForm.css文件。
import './ExpenseForm.css'第 6 步 - 创建一个类 ExpenseForm 并使用 props 调用构造函数。
class ExpenseForm extends React.Component {
	 	constructor(props) {
	 	 	 super(props);
	 	}
}初始化组件的状态。
this.state = {
	 	item: {}
}创建 render() 方法并添加一个带有输入字段的表单以添加费用项目。
render() {
	 	return (
	 	 	 <div id="expenseForm">
	 	 	 	 	<form>
	 	 	 	 	 	 <label for="name">Title</label>
	 	 	 	 	 	 <input type="text" id="name" name="name" placeholder="Enter expense title" />
	 	 	 	 	 	 <label for="amount">Amount</label>
	 	 	 	 	 	 <input type="number" id="amount" name="amount" placeholder="Enter expense amount" />
	 	 	 	 	 	 <label for="date">Spend Date</label>
	 	 	 	 	 	 <input type="date" id="date" name="date" placeholder="Enter date" />
	 	 	 	 	 	 <label for="category">Category</label>
	 	 	 	 	 	 <select id="category" name="category"
	 	 	 	 	 	 	 <option value="">Select</option>
	 	 	 	 	 	 	 <option value="Food">Food</option>
	 	 	 	 	 	 	 <option value="Entertainment">Entertainment</option>
	 	 	 	 	 	 	 <option value="Academic">Academic</option>
	 	 	 	 	 	 </select>
	 	 	 	 	 	 <input type="submit" value="Submit" />
	 	 	 	 	</form>
	 	 	 </div>
	 	)
}为所有输入字段创建事件处理程序,以更新状态中的费用详细信息。
handleNameChange(e) {
	 	this.setState( (state, props) => {
	 	 	 let item = state.item
	 	 	 item.name = e.target.value;
	 	 	 return { item: item }
	 	});
}
handleAmountChange(e) {
	 	this.setState( (state, props) => {
	 	 	 let item = state.item
	 	 	 item.amount = e.target.value;
	 	 	 return { item: item }
	 	});
}
handleDateChange(e) {
	 	this.setState( (state, props) => {
	 	 	 let item = state.item
	 	 	 item.date = e.target.value;
	 	 	 return { item: item }
	 	});
}
handleCategoryChange(e) {
	 	this.setState( (state, props) => {
	 	 	 let item = state.item
	 	 	 item.category = e.target.value;
	 	 	 return { item: item }
	 	});
}在构造函数中绑定事件处理程序。
this.handleNameChange = this.handleNameChange.bind(this);
this.handleAmountChange = this.handleAmountChange.bind(this);
this.handleDateChange = this.handleDateChange.bind(this);
this.handleCategoryChange = this.handleCategoryChange.bind(this);接下来,为提交操作添加事件处理程序。
onSubmit = (e) => {
	 	e.preventDefault();
	 	alert(JSON.stringify(this.state.item));
}将事件处理程序附加到窗体。
render() {
	 	return (
	 	 	 <div id="expenseForm">
	 	 	 	 	<form onSubmit={(e) => this.onSubmit(e)}>
	 	 	 	 	 	 <label for="name">Title</label>
	 	 	 	 	 	 <input type="text" id="name" name="name" placeholder="Enter expense title"
	 	 	 	 	 	 	 	value={this.state.item.name}
	 	 	 	 	 	 	 	onChange={this.handleNameChange} />

	 	 	 	 	 	 <label for="amount">Amount</label>
	 	 	 	 	 	 <input type="number" id="amount" name="amount" placeholder="Enter expense amount"
	 	 	 	 	 	 	 	value={this.state.item.amount}
	 	 	 	 	 	 	 	onChange={this.handleAmountChange} />

	 	 	 	 	 	 <label for="date">Spend Date</label>
	 	 	 	 	 	 <input type="date" id="date" name="date" placeholder="Enter date"
	 	 	 	 	 	 	 	value={this.state.item.date}
	 	 	 	 	 	 	 	onChange={this.handleDateChange} />

	 	 	 	 	 	 <label for="category">Category</label>
	 	 	 	 	 	 <select id="category" name="category"
	 	 	 	 	 	 	 	value={this.state.item.category}
	 	 	 	 	 	 	 	onChange={this.handleCategoryChange} >
	 	 	 	 	 	 	 <option value="">Select</option>
	 	 	 	 	 	 	 <option value="Food">Food</option>
	 	 	 	 	 	 	 <option value="Entertainment">Entertainment</option>
	 	 	 	 	 	 	 <option value="Academic">Academic</option>
	 	 	 	 	 	 </select>

	 	 	 	 	 	 <input type="submit" value="Submit" />
	 	 	 	 	</form>
	 	 	 </div>
	 	)
}最后,导出组件。
export default ExpenseFormExpenseForm 组件的完整代码如下:
import React from 'react';
import './ExpenseForm.css'

class ExpenseForm extends React.Component {
	 	constructor(props) {
	 	 	 super(props);
	 	 	 this.state = {
	 	 	 	 	item: {}
	 	 	 }
	 	 	 this.handleNameChange = this.handleNameChange.bind(this);
	 	 	 this.handleAmountChange = this.handleAmountChange.bind(this);
	 	 	 this.handleDateChange = this.handleDateChange.bind(this);
	 	 	 this.handleCategoryChange = this.handleCategoryChange.bind(this);
	 	}
	 	handleNameChange(e) {
	 	 	 this.setState( (state, props) => {
	 	 	 	 	let item = state.item
	 	 	 	 	item.name = e.target.value;
	 	 	 	 	return { item: item }
	 	 	 });
	 	}
	 	handleAmountChange(e) {
	 	 	 this.setState( (state, props) => {
	 	 	 	 	let item = state.item
	 	 	 	 	item.amount = e.target.value;
	 	 	 	 	return { item: item }
	 	 	 });
	 	}
	 	handleDateChange(e) {
	 	 	 this.setState( (state, props) => {
	 	 	 	 	let item = state.item
	 	 	 	 	item.date = e.target.value;
	 	 	 	 	return { item: item }
	 	 	 });
	 	}
	 	handleCategoryChange(e) {
	 	 	 this.setState( (state, props) => {
	 	 	 	 	let item = state.item
	 	 	 	 	item.category = e.target.value;
	 	 	 	 	return { item: item }
	 	 	 });
	 	}
	 	onSubmit = (e) => {
	 	 	 e.preventDefault();
	 	 	 alert(JSON.stringify(this.state.item));
	 	}
	 	render() {
	 	 	 return (
	 	 	 	 	<div id="expenseForm">
	 	 	 	 	 	<form onSubmit={(e) => this.onSubmit(e)}>
	 	 	 	 	 	 <label for="name">Title</label>
	 	 	 	 	 	 <input type="text" id="name" name="name" placeholder="Enter expense title"
	 	 	 	 	 	 	 	value={this.state.item.name}
	 	 	 	 	 	 	 	onChange={this.handleNameChange} />

	 	 	 	 	 	 <label for="amount">Amount</label>
	 	 	 	 	 	 <input type="number" id="amount" name="amount" placeholder="Enter expense amount"
	 	 	 	 	 	 	 	value={this.state.item.amount}
	 	 	 	 	 	 	 	onChange={this.handleAmountChange} />

	 	 	 	 	 	 <label for="date">Spend Date</label>
	 	 	 	 	 	 <input type="date" id="date" name="date" placeholder="Enter date"
	 	 	 	 	 	 	 	value={this.state.item.date}
	 	 	 	 	 	 	 	onChange={this.handleDateChange} />

	 	 	 	 	 	 <label for="category">Category</label>
	 	 	 	 	 	 <select id="category" name="category"
	 	 	 	 	 	 	 	value={this.state.item.category}
	 	 	 	 	 	 	 	onChange={this.handleCategoryChange} >
	 	 	 	 	 	 	 <option value="">Select</option>
	 	 	 	 	 	 	 <option value="Food">Food</option>
	 	 	 	 	 	 	 <option value="Entertainment">Entertainment</option>
	 	 	 	 	 	 	 <option value="Academic">Academic</option>
	 	 	 	 	 	 </select>

	 	 	 	 	 	 <input type="submit" value="Submit" />
	 	 	 	 	 	</form>
	 	 	 	 	</div>
	 	 	 )
	 	}
}
export default ExpenseForm;index.js -
接下来,创建一个文件,index.js src 文件夹下并使用 ExpenseForm 组件。
import React from 'react';
import ReactDOM from 'react-dom';
import ExpenseForm from './components/ExpenseForm'

ReactDOM.render(
	 	<React.StrictMode>
	 	 	 <ExpenseForm />
	 	</React.StrictMode>,
	 	document.getElementById('root')
);index.html -
最后,在根文件夹下创建一个公共文件夹,并创建index.html文件。
<!DOCTYPE html>
<html lang="en">
	 	<head>
	 	 	 <meta charset="utf-8">
	 	 	 <title>React App</title>
	 	</head>
	 	<body>
	 	 	 <div id="root"></div>
	 	 	 <script type="text/JavaScript" src="./index.js"></script>
	 	</body>
</html>使用 npm 命令为应用程序提供服务。
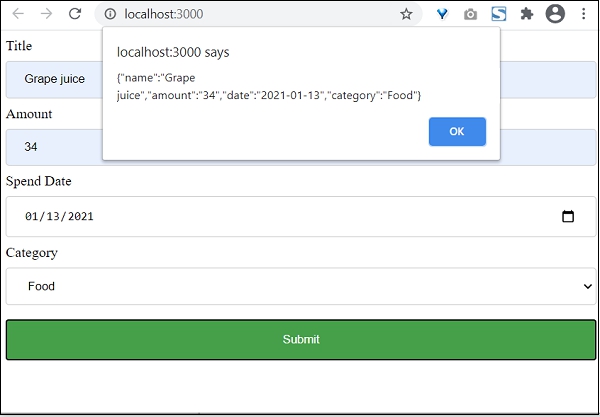
打开浏览器,在地址栏中输入 http://localhost:3000,然后按回车键。

最后,输入示例费用详细信息,然后单击提交。提交的数据将被收集并显示在弹出消息框中。


