如今,React 已成为用于创建动态和交互式用户界面的流行库。React 的一个基本特性是生命周期方法,它允许开发人员在组件的整个生命周期中控制组件的行为。因此,我们将重点介绍 componentDidUpdate 生命周期方法。
什么是 componentDidUpdate?
componentDidUpdate 是一个 React 函数,当我们的组件使用新数据重新渲染时会调用该函数。假设我们的组件中发生了任何更改,并且我们想要响应这些更改。它类似于更新后通知。
重要的是要知道,首次创建组件时不会调用 componentDidUpdate。只有当我们的组件中的某些内容发生变化时,例如接收新数据或属性时,它才会在第一次渲染后调用。
语法
componentDidUpdate(prevProps, prevState)
参数
- prevProps - 这是我们组件属性在更新前的快照。将其视为组件在更改之前的外观记录。我们可以将其与我们当前的道具进行比较,看看有什么变化。
- prevState - 这是更改前组件状态的快照,类似于 prevProps。这类似于在组件更改之前记录组件的状态。
返回值
componentDidUpdate 方法不返回任何内容。
为什么选择 componentDidUpdate!
当我们需要更改网页的文本、处理网络请求或在更新后根据新数据调整组件的状态时,这种方法会有所帮助。
例如,我们正在创建一个聊天应用程序。因此,当用户更改为不同的聊天室或更改 URL 时,我们将不得不执行一些操作,例如断开与当前聊天的连接并连接到新聊天。因此,在这种情况下,componentDidUpdate 是正确的选择。
例子
示例 - 计数器应用程序
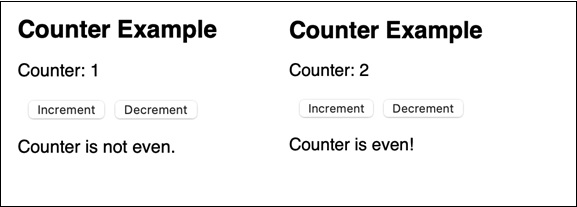
现在我们将使用 componentDidUpdate 函数。在此示例中,我们将创建一个计数器应用程序,允许用户增加或减少计数器的值。我们将使用 componentDidUpdate 来查看计数器值是否已更改,如果已更改,则显示一条消息。
import React, { Component } from "react";

class App extends Component {
	 	constructor(props) {
	 	 	 super(props);
	 	 	 this.state = {
	 	 	 	 	counter: 0,
	 	 	 	 	message: ""
	 	 	 };
	 	}
	 	componentDidMount() {
	 	 	 this.updateMessage();
	 	}
	 	componentDidUpdate(prevProps, prevState) {
	 	 	 if (this.state.counter !== prevState.counter) {
	 	 	 	 	this.updateMessage();
	 	 	 }
	 	}
	 	updateMessage() {
	 	 	 if (this.state.counter % 2 === 0) {
	 	 	 	 	this.setState({
	 	 	 	 	 	 message: "Counter is even!"
	 	 	 	 	});
	 	 	 } else {
	 	 	 	 	this.setState({
	 	 	 	 	 	 message: "Counter is not even."
	 	 	 	 	});
	 	 	 }
	 	}
	 	 	 incrementCounter = () => {
	 	 	 	 	this.setState((prevState) => ({
	 	 	 	 	 	 counter: prevState.counter + 1
	 	 	 	 	}));
	 	 	 };

	 	 	 decrementCounter = () => {
	 	 	 this.setState((prevState) => ({
	 	 	 	 	counter: prevState.counter - 1
	 	 	 }));
	 	};

	 	render() {
	 	 	 return (
	 	 	 	 	<div>
	 	 	 	 	 	 <h1>Counter Example</h1>
	 	 	 	 	 	 <p>Counter: {this.state.counter}</p>
	 	 	 	 	 	 <button onClick={this.incrementCounter}>Increment</button>
	 	 	 	 	 	 <button onClick={this.decrementCounter}>Decrement</button>
	 	 	 	 	 	 <p>{this.state.message}</p>
	 	 	 	 	</div>
	 	 	 );
	 	}
}

export default App;
输出

当我们执行应用程序时,我们将看到两个按钮,一个用于递增,一个用于递减。当我们单击递增或递减按钮以增加或减少计数器时,消息会根据计数器是偶数还是奇数而变化。这显示了如何使用 componentDidUpdate 来响应组件状态的变化并采取必要的操作。
示例 - 显示更新的数据
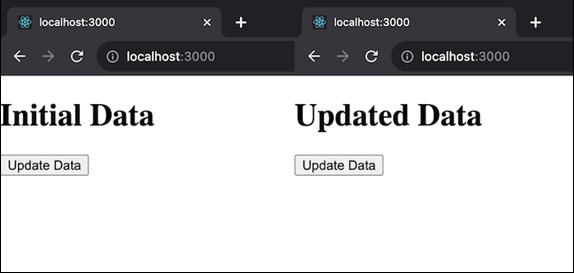
此应用演示如何使用 componentDidUpdate 来响应组件状态的变化,特别是在数据更新时。因此,我们将使用初始数据状态进行初始化。然后在网页上显示数据。此外,我们还将提供一个按钮来更新数据。因此,当数据更新时,它会将一条消息记录到控制台。
import React, { Component } from 'react';

class App extends Component {
	 	constructor(props) {
	 	 	 super(props);
	 	 	 this.state = {
	 	 	 	 	data: 'Initial Data',
	 	 	 };
	 	}
	 	componentDidUpdate(prevProps, prevState) {
	 	 	 if (prevState.data !== this.state.data) {
	 	 	 	 	console.log('Data updated:', this.state.data);
	 	 	 }
	 	}
	 	updateData = () => {
	 	 	 this.setState({ data: 'Updated Data' });
	 	};
	 	render() {
	 	 	 return (
	 	 	 	 	<div>
	 	 	 	 	 	 <h1>{this.state.data}</h1>
	 	 	 	 	 	 <button onClick={this.updateData}>Update Data</button>
	 	 	 	 	</div>
	 	 	 );
	 	}
}

export default App;
输出

示例 - 动态标题应用程序
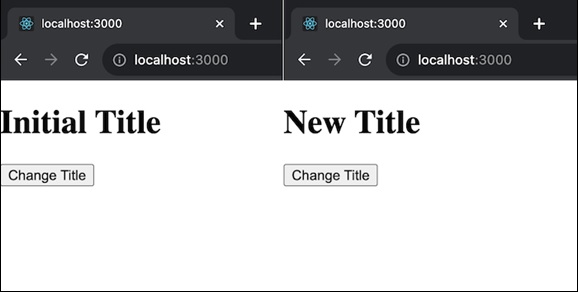
此应用程序展示了如何使用 componentDidUpdate 根据组件状态的变化动态更新文档的标题。因此,我们将首先使用初始页面标题状态进行初始化。然后我们将在网页上显示页面标题。然后我们将提供一个按钮来更改标题。更新标题时,它会动态更改文档标题,并将此更改记录到控制台中。
import React, { Component } from 'react';

class App extends Component {
	 	constructor(props) {
	 	 	 super(props);
	 	 	 this.state = {
	 	 	 	 	pageTitle: 'Initial Title',
	 	 	 };
	 	}
	 	componentDidUpdate(prevProps, prevState) {
	 	 	 if (prevState.pageTitle !== this.state.pageTitle) {
	 	 	 	 	document.title = this.state.pageTitle;
	 	 	 }
	 	}
	 	updateTitle = () => {
	 	 	 this.setState({ pageTitle: 'New Title' });
	 	};
	 	render() {
	 	 	 return (
	 	 	 	 	<div>
	 	 	 	 	 	 <h1>{this.state.pageTitle}</h1>
	 	 	 	 	 	 <button onClick={this.updateTitle}>Change Title</button>
	 	 	 	 	</div>
	 	 	 );
	 	}
}

export default App;
输出

笔记
- 如果我们想阻止 componentDidUpdate 被调用,请使用 shouldComponentUpdate 函数并返回 false。如果我们需要控制更新发生的时间,这将非常有用。
- 确保避免创建无限循环。我们应该利用 componentDidUpdate 中的条件来确定更新后是否真的需要做任何事情。如果我们避免这种情况,我们的组件可能会无限期地继续更新。
- 如果可能,请避免在 componentDidUpdate 中使用 setState。它可能会导致额外的呈现,在某些情况下可能会对性能产生影响。
总结
componentDidUpdate 是一个 React 函数,在我们的组件更新后调用。这就像一条消息,显示我们的组件中的某些内容已更改,我们可以对该更改做出反应。我们可以通过比较以前的数据(props 和 state)和现在的数据来选择下一步要做什么。


